
Have you ever wondered how you scan something meaningful such as your child’s artwork poster or legal contracts, but you realize they are bigger than 8.5” x 11”? Good news! The ScanSnap iX1500 is fully capable of scanning those special documents. In this blog, we will explain the steps on how you can successfully scan important items into your computer.
Tips on Scanning documents in 8.5" wide and longer than 11"
When scanning a document that is 8.5" wide and longer than 11", here are the easy steps you want to follow.
- Open your ScanSnap iX1500 and the ScanSnap Home application.
- Set up your iX1500 properly. There is an extension attached to your ScanSnap iX1500 paper stacker. You can pull out to keep your paper from falling.
- Select the profile you would like to scan to on your LCD touch screen.
- Load the document face-down and top-first with its back facing you. Hold down the document with your hand so that it does not fall out of the paper tray. Make sure to align the side guides of the document so that the document does not get skewed while scanning.
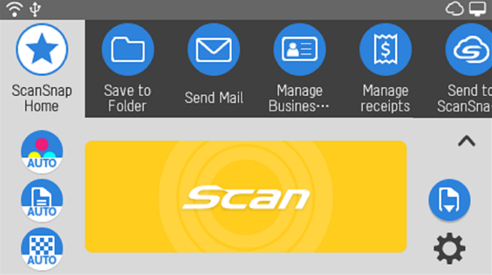
- On your iX1500 LCD touch screen, hold down the [Scan] button for 3 seconds or longer in the home screen on the touch panel to scan the documents.
The LCD screen is changed yellow as below. Voilà! You have successfully scanned a longer page document.
Tips on Scanning Documents that are wider than 8.5" and longer than 11"
Here are the tips when you are scanning a document that is wider than 8.5" and longer than 11".
- Open your ScanSnap iX1500 and the ScanSnap Home application.
- Set up your iX1500 properly. There is an extension attached to your ScanSnap iX1500 paper stacker. You can pull out to keep your paper from falling.
- Select the profile you would like to scan to on your LCD touch screen.
- Fold the document in half with the sides to be scanned facing out. Make sure to align the side guides of the document so the document does not get skewed while scanning.
- Hold down the [Scan] button for 3 seconds or longer on your iX1500 LCD screen.
Next, you will need to merge the pages together.
- Look at the Main Window display of ScanSnap Home. In the ScanSnap Home data record list view, select an image with a multi-page image which contains two pages you want to merge next display the viewer window.
- Click [Switch View] on the [Home] tab to display the submenu and select [Show all] or [Show Pages Panel] from the submenu.
- Select two pages to be merged. Select the pages while holding down the [Ctrl] key or [Shift] key. On the [Edit] tab, click Merge pages, then click [Vertically] or [Horizontally].
- Select the page layout after the pages are merged in the [Merging Layout] window. Click the [OK] button.
- Click the [File] tab and select [Save] or [Save as] from the file menu.
The image with the two pages merged into a double-spread page is saved!
We hope you find these scanning tips helpful. Once you organize the data properly, you can easily manage various types of scanned documents and save time on looking for the data you need with a greater peace of mind. Let us know how you are going to start organizing them and contact us here if you have any questions about ScanSnap.