FAQ
Yes. To evaluate PaperStream AI, you need licenses for both PaperStream Capture Pro and PaperStream AI. You can use a standard PaperStream Capture Pro subscription license with a PaperStream AI evaluation license.
The trial lasts for 60 days or 200 sets of scanned images (each a “Batch”), whichever comes first. Each Batch shall not exceed 9,999 images total.
Follow the procedure below to migrate the operational environment from a computer (PC-A) to another computer (PC-B).
Before proceeding, make sure you have your PaperStream Capture Pro/Pro Premium license code.
1. Steps on the PC-A
On the computer where you want to export the environment, sign in to Windows as a user with administrator privileges and perform the following.
1.1 Exporting an Operational Environment
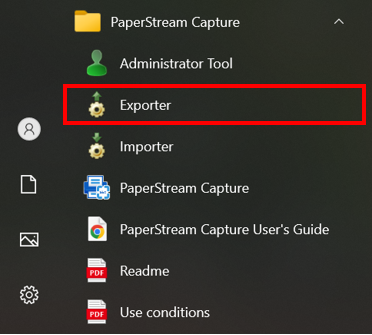
1. Start Exporter by selecting the following items in the order listed. Windows logo button on the taskbar > [PaperStream Capture] > [Exporter]
2. Click [Select All] to select the check boxes for all profiles and click the [Run] button.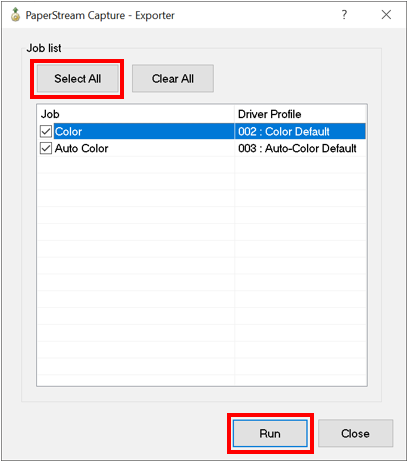
3. On the [Save As] window, specify the location for saving the file, enter a file name of your choice, and click the [Save] button.
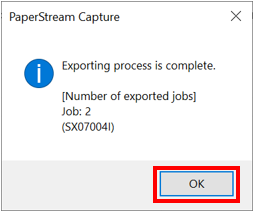
4. A message indicating the completion of exporting process will be displayed. Make sure that the operational environment file (.cab or .dpav) has been saved.
1.2 Deactivating the License
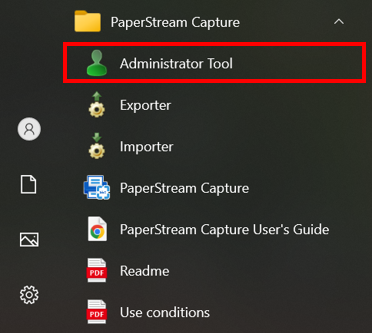
1. Start the Administrator Tool by selecting the following items in the order listed. Windows logo button on the taskbar > [PaperStream Capture] > [Administrator Tool]
2. In the [Activation] tab, click [Deactivate].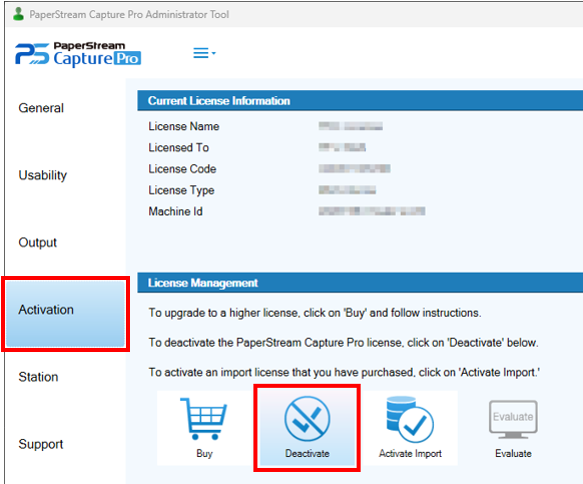
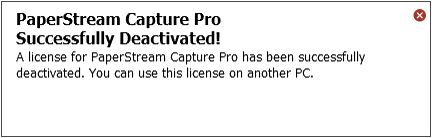
Note:
- If your version of PaperStream Capture is earlier than V4.x, refer to the FAQ to deactivate it.
- If you do not have your license certificate on hand, take note of the license code before clicking [Deactivate].
2. Stes on PC-B
On the target computer, sign in to Windows with administrator privileges and perform the following steps.
2.1 Installing PaperStream Capture Pro
Install the latest version of PaperStream Capture Pro. There are two ways to install PaperStream Capture Pro. Use either of the following:
- For users using version 4.x or earlier download from here.
- For users using version 5.x or later download from here.
2.2 Activating the License
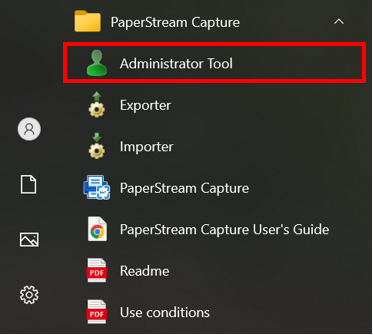
1. Start the Administrator Tool by selecting the following items in the order listed. Windows logo button on the taskbar > [All] > [PaperStream Capture] > [Administrator Tool]
2. In the [Activation] tab, click [Activate].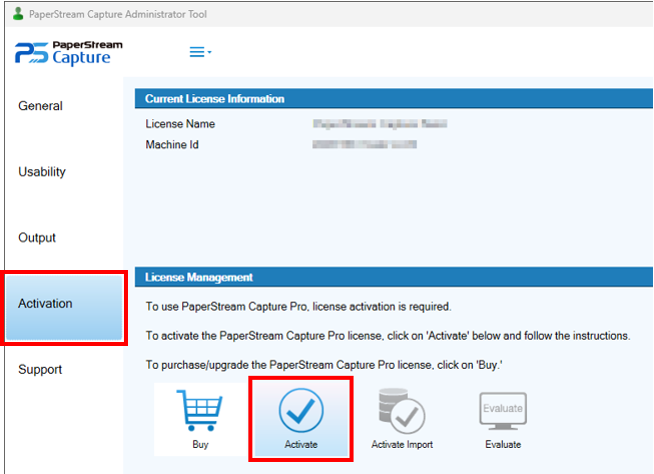
The window for entering the license code is displayed.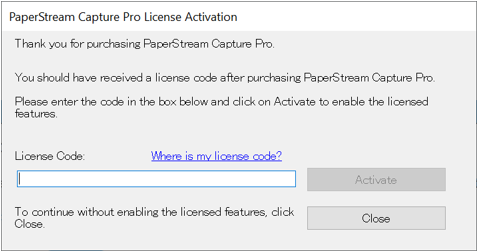
3. Enter your license code. The license code can be found on the license certificate.
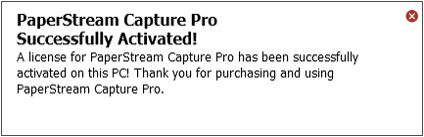
4. Click [Activation]. Make sure that a message indicating successful activation is displayed.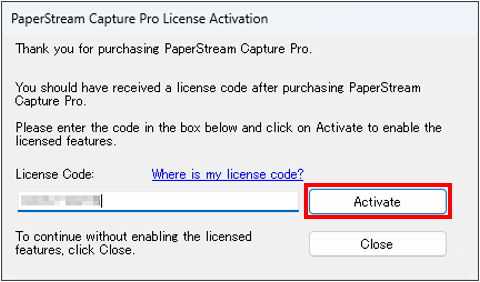
2.3 Importing an Operational Environment(*)
1. Copy the operational environment file exported from the PC-A to the PC-B.
2. Start the Importer by selecting the following items in the order listed. Windows logo button on the taskbar > [All] > [PaperStream Capture] > [Importer]
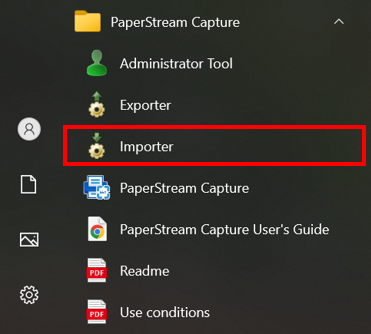
3. Use the [Browse] button to select the operational environment file to be imported.
4. For [Type of import], select [Replace All] and the [Import driver profiles] check box and click [Run].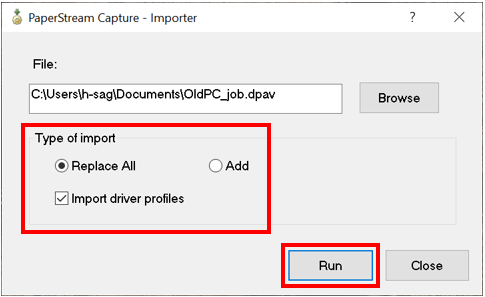
5. Make sure that a message indicating the completion of the importing process is displayed.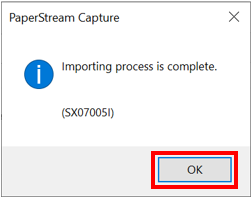
*: If the PC-A was operated as a "station" in the PaperStream Capture Pro multi-station configuration, start the [Administrative Tool] on the new computer, set the storage server address for [Storage Server] in the [Station] tab, and then follow the procedure in "2.3 Importing an Operational Environment".
<How to Configure the Windows Operating System>
- Log in to the computer as a user with Administrator privileges. If no scanner driver is installed, install it beforehand.
- Make sure that the scanner and computer are connected by USB before turning on the scanner.
- Click the [Start] menu on Windows > [Control Panel] > [Devices and Printers].
- Right-click on the scanner icon, and select [Scan properties] from the displayed menu.
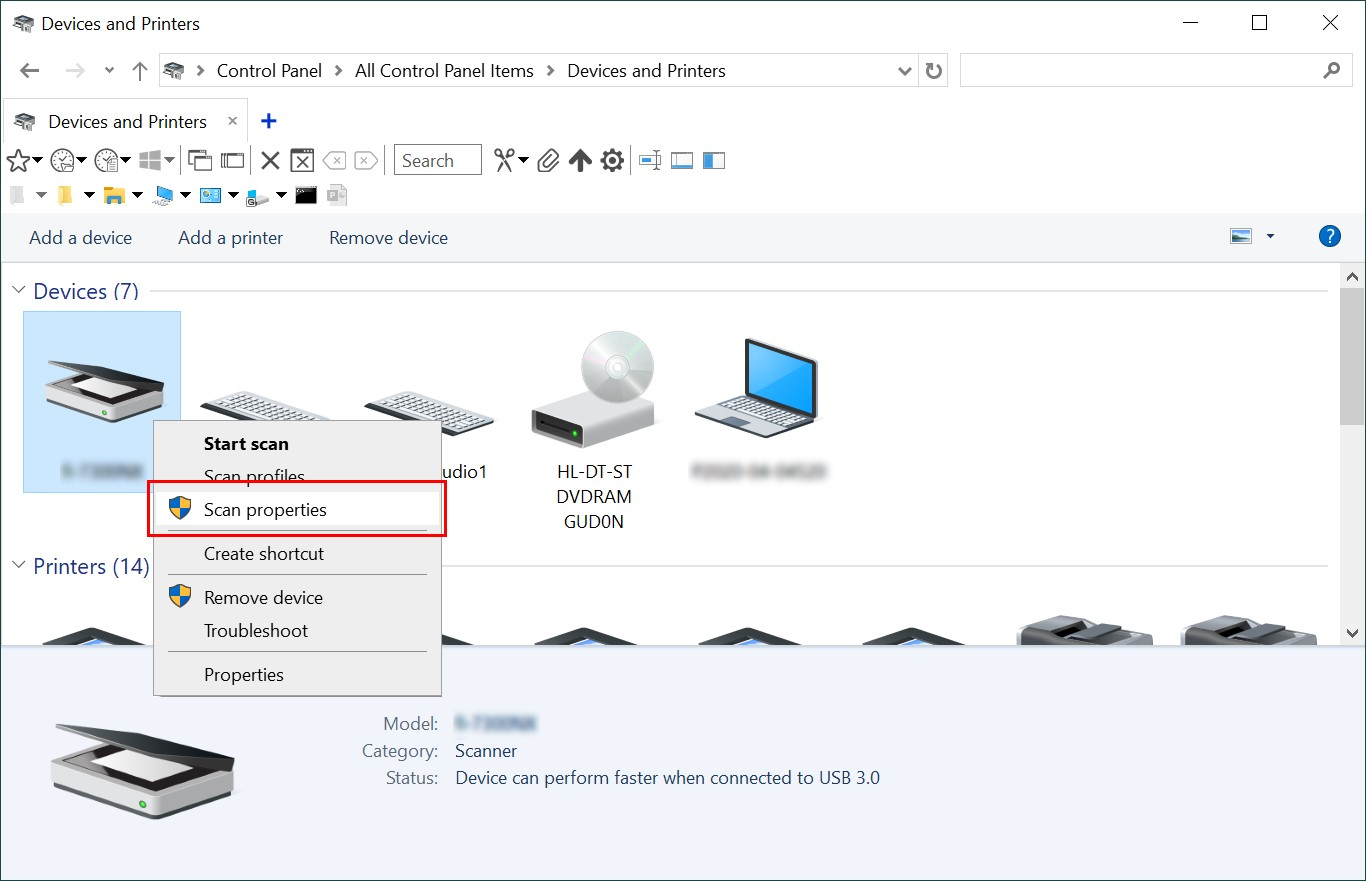
- In the [Events] tab in the scanner properties window, perform the following procedure. i. From the [Select an event] drop-down list, select the Scan button. ii. From the [Start this program] drop-down list, select the application to be launched when the Scan button is pressed.
- Click the [OK] button to save the settings.
Example: The following is an example of setting PaperStream Capture to launch when the Scan Button is pressed.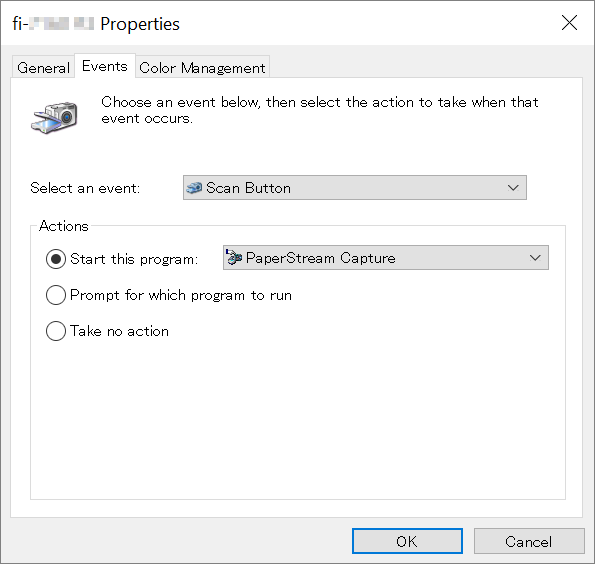
<How to Configure an Application>
To check whether your application supports the function that allows it to be launched with a button, refer to the user's guide of the application.
In the following procedure, PaperStream Capture (Pro / Pro Premium) is used as the example. (PaperStream Capture needs to be installed beforehand.)
- Click [Start] menu on Windows > [PaperStream Capture] > [Administrator Tool].
- Select the [Usability] tab. For the [Scan] in [Event], select the job to be used when the [Scan] button is pressed.
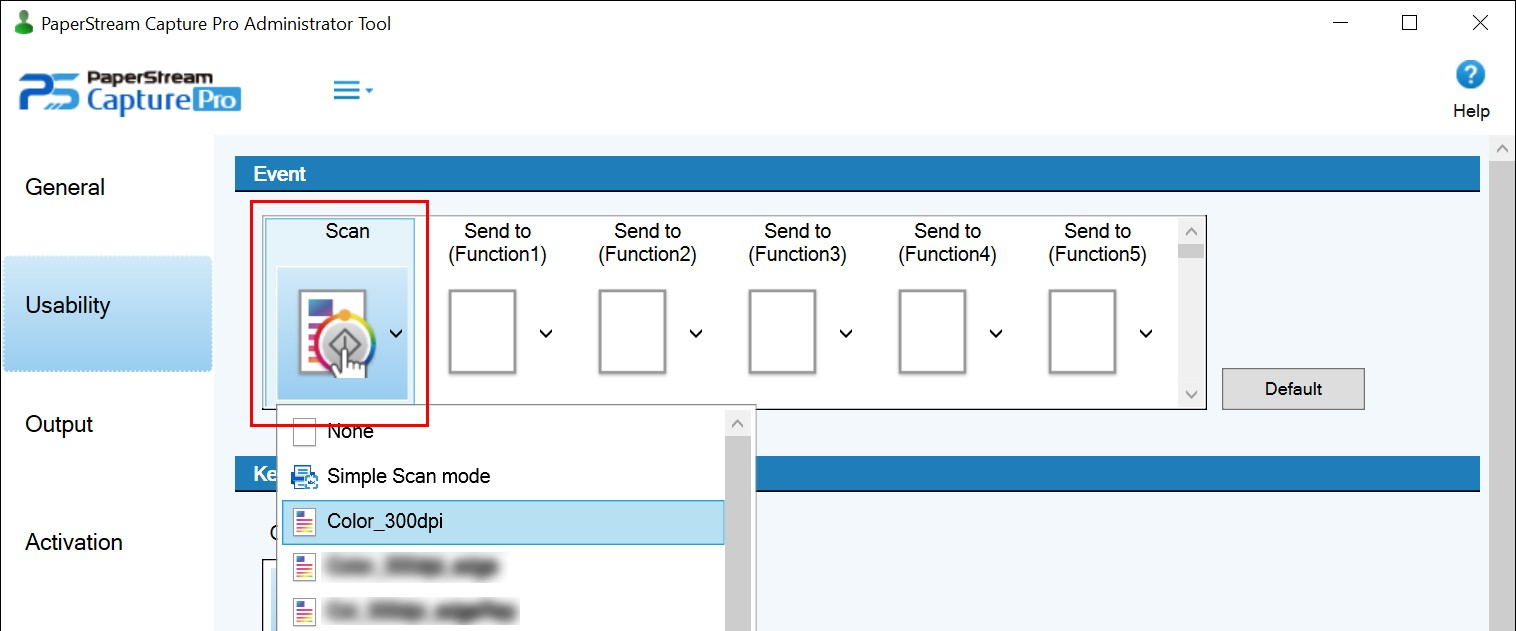
- Save the settings with the [Save] button, then close the administrator tool.
- Press the [Scan] button on the touch screen or operator panel and confirm that scanning starts.
Follow the procedure below to configure the required settings in Network Setup Tool for fi Series(*) and the application. For scanners connected via USB, refer to this article.
*: If Network Setup Tool for fi Series is not installed, download and install it in advance from here.
For details about the initial network settings such as IP Address, refer to the Network Setup Tool for fi Series help.
<Settings in Network Setup Tool for the fi Series>
- Select the scanner in [Scanner Selection Tool]
- Click the [Start] menu on Windows > [fi Series] > [Scanner Selection Tool for fi Series].
- Select a scanner to use from the list of scanners connected to the network.
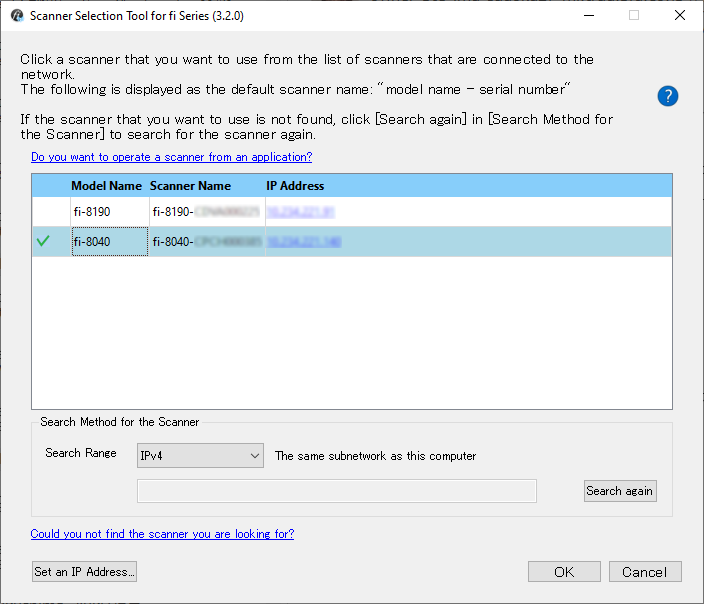
- Select the application to launch in Button Event Manager
- Click [Start] menu on Windows > [fi Series] > [Button Event Manager for fi Series](*).
- Right-click the Button Event Manager icon
 in the notification area on the taskbar and select the [Watch Button Event] on the menu.
 - On the same way, click [Configure button settings] on the menu and configure the following settings in the displayed [Button Settings] window.
- Select [Scan Button] from the [Select an event] drop-down list.
- Under [Operation], select the program to launch when the Scan button is pressed.
Example: The following is an example of setting PaperStream Capture to launch when the Scan button is pressed.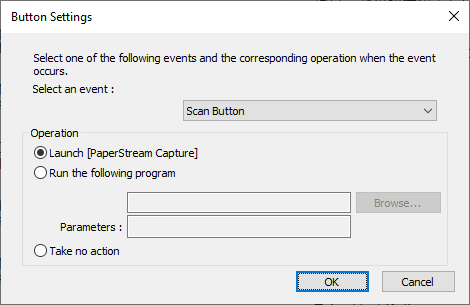
*: This procedure is for Windows 10. For details about how to launch the application on each OS, refer to the Network Setup Tool for fi Series help.
<Setting in the Application>
To check whether your application supports the function that allows it to be launched with a button, refer to the user's guide of the application.
In the following procedure, PaperStream Capture (Pro / Pro Premium) is used as the example. (PaperStream Capture needs to be installed beforehand.)
- Click [Start] menu on Windows > [PaperStream Capture] > [Administrator Tool].
- Select the [Usability] tab. For the [Scan] in [Event], select the job to be used when the [Scan] button is pressed.
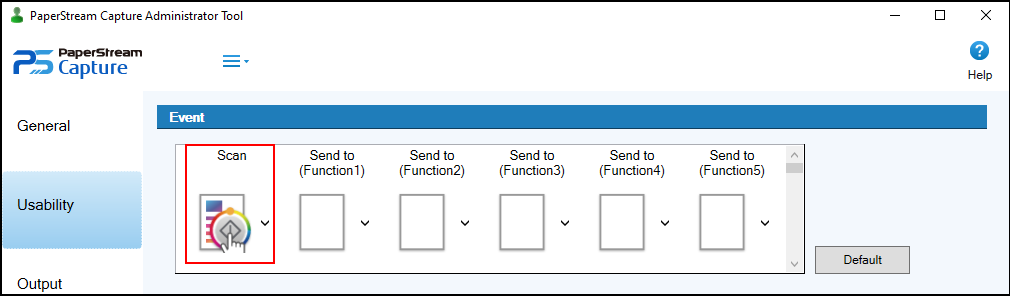
- Click the [Save] button to save the settings, then close the administrator tool.
- Press the Scan button on the touch screen or operator panel of the scanner and confirm that scanning starts.
Note: Due to this setting, one computer will occupy the scanner, preventing other computers from connecting to the scanner. For details, refer to this article.
Yes. PaperStream Capture Pro/Pro Premium (6.0.1 or above) and PaperStream AI are designed to work together. Both licenses are required to access the full capabilities.
You need PaperStream Capture Pro/Pro Premium version 6.0.1 or later. The latest version is available at https://www.pfu.ricoh.com/global/scanners/fi/dl/win-pscpremium-list.html.
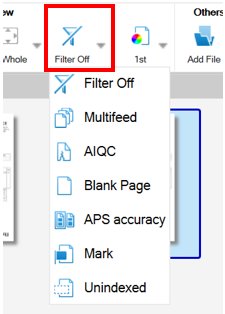
If a multifeed or image abnormality is detected during scanning, the function displays the detected image with marks (thumbnail background colors and viewer frame colors) in the image confirmation window.
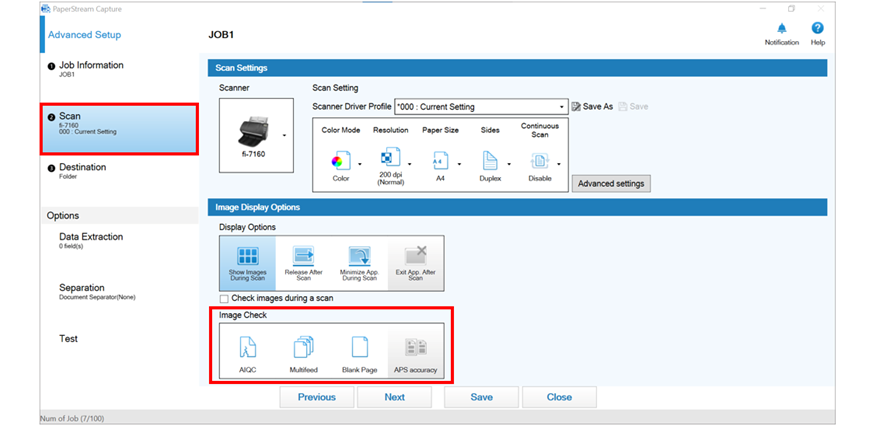
Operators can quickly review only the marked images in the confirmation window. If an index file is set up, the detected details will also be saved there.
The following types of marks (thumbnail background colors and viewer frame colors) are available:
- Yellow: AIQC (detects a fold or tear in the documents)
- Red: Multifeed (detects overlapping)
- Black: Blank page (detects a blank page)
- Purple: Low APS accuracy (the scanned image is detected by Automatic Profile Selection and is recognized inaccurately)
- Orange: Manual mark (marked by user)
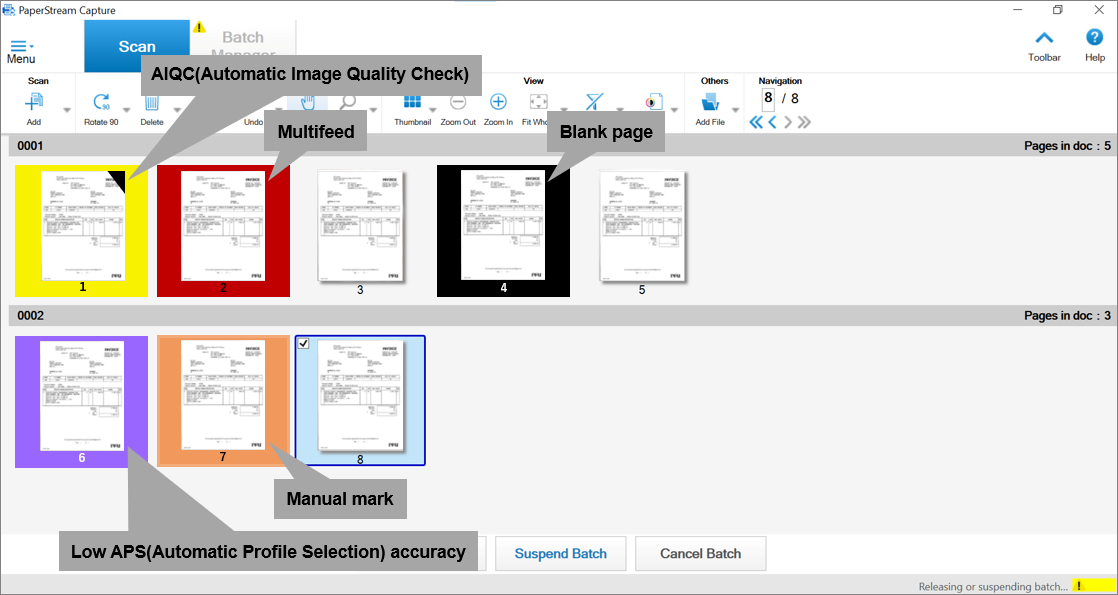
When [Multifeed] is selected for this function, scanning is not interrupted even if a multifeed occurs during scanning, and all loaded documents are scanned. You can improve work efficiency by checking and processing all target images after scanning.
Note: If a document is jammed, scanning will be stopped to prevent the document from being damaged.
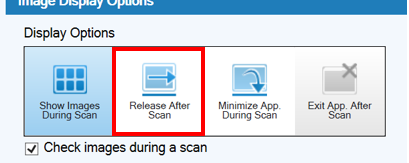
[Important] If you select [AIQC], [Multifeed], [Blank page], or [APS accuracy] for [Image Check] and want to check the detected images in the image confirmation window, do not select [Release After Scan] for [Display Options].
Tips!
- It is recommended that you check the scanned image for any problems if an AIQC, multifeed, or APS accuracy error is detected.
- Images with a specific mark can be displayed selectively by selecting the display filter from the toolbar in the image confirmation window.
Yes. There are two methods, depending on how the barcode is printed on the page.
When using a barcode printed on each page of the document
When using a barcode printed on a document separator in the document stack
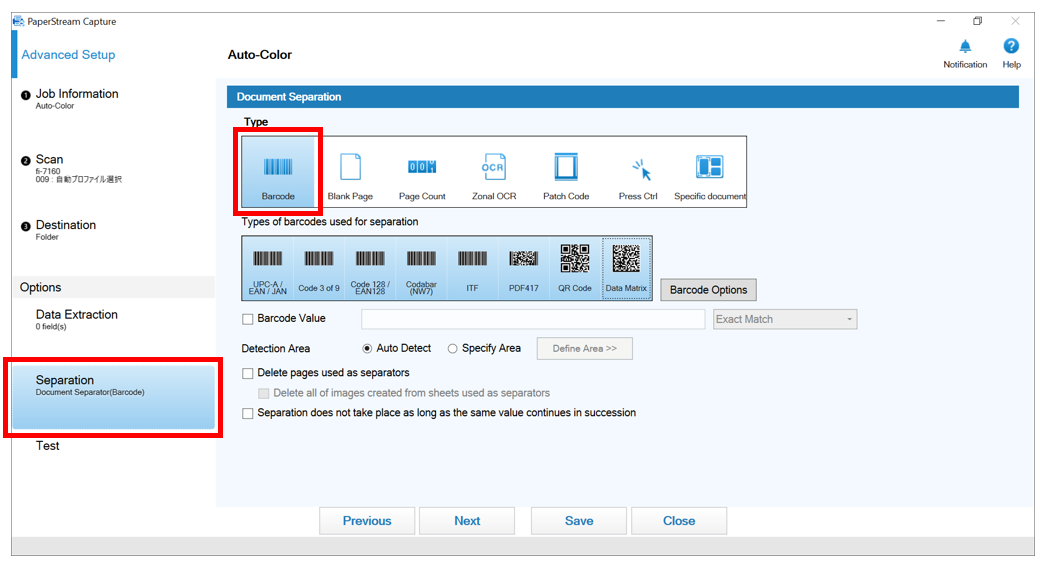
1. Select [Barcode] as the document separator in [Separation] on the profile configuration window.
Tips!
- When scanning specific barcodes, operators should deselect types that are not required.
- Selecting the [Barcode Value] checkbox and entering a character string ensures only matching barcodes act as separators.
- If multiple barcodes appear on a separator page, operators can use [Define Area] to specify the barcode location.
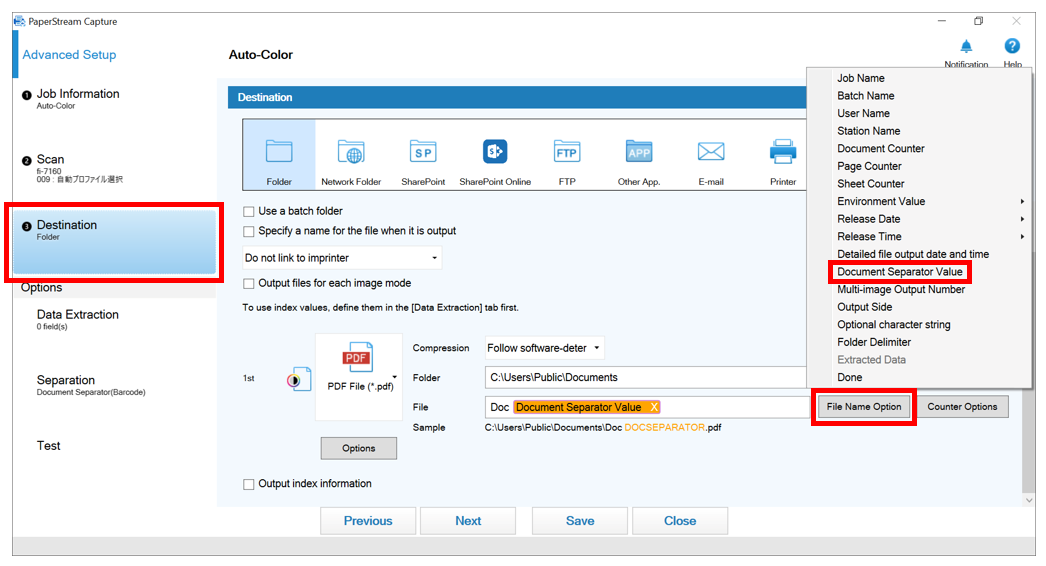
2. In [3. Destination] in the profile configuration window, click the [File Name Option] button to the right of the file name input field and select [Document Separator Value].
Tips!
- The document separator value can also be used in an index file name.
- If a folder delimiter is inserted, the character string before the folder delimiter becomes the folder name.
- It is not possible to use a part of a character string that has been extracted.
Yes, you can separate scanned files automatically using the values of barcodes or QR codes on scanned documents.
For details, refer to the following video: https://youtu.be/BASdP7VZU0o
Specify the following setting in the PaperStream Capture.
Specify [SinglePage PDF File (*.pdf)] for the output file format
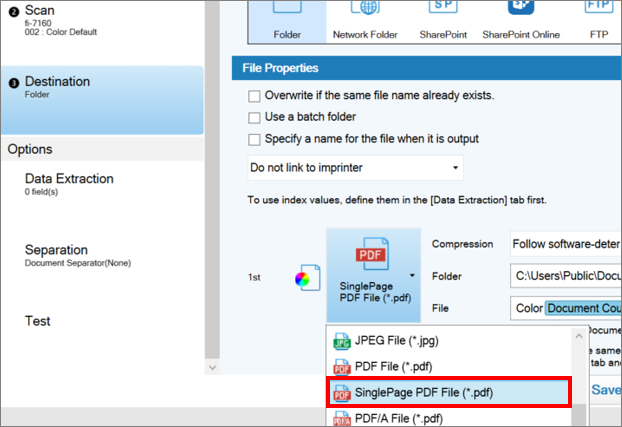
For example, when you scan three documents in duplex scanning mode, it will output six(*) single-page PDF files. *: 2 images (images on front side and back side) x 3 documents = 6 files in total
Tips!
When outputting single‑page PDF files, operators should add a naming rule such as [Page Counter] to prevent duplicate file names.
Output Multi-page PDF files
Specify [PDF File (*.pdf)] for the output file format.
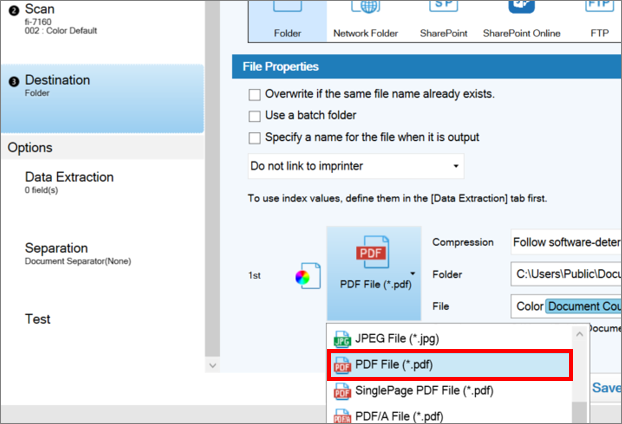
Scanning three documents in duplex mode produces one PDF file with six pages of images.
Target PaperStream Applications: Capture / Capture Pro / Capture Pro Premium
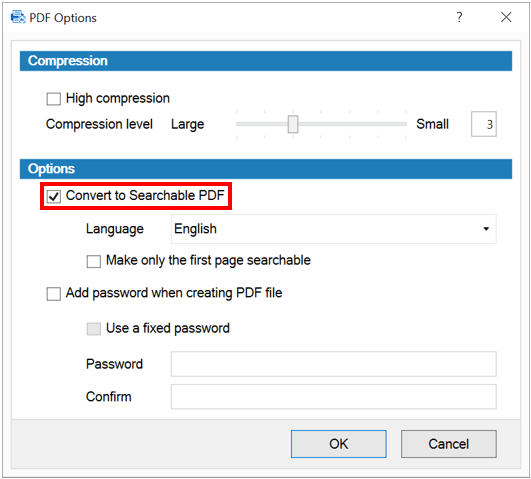
OCR text recognition can be applied to character strings in a document to generate a searchable PDF file.
Follow the setting procedure below.
For Batch Scan mode
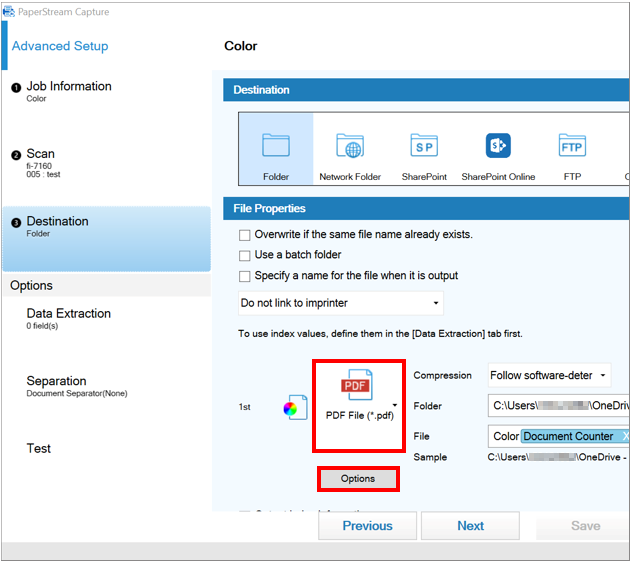
1. Display [3. Destination] in [Configure Jobs].
2. Select the PDF file format, then click the [Options] button.
Note: [PDF File (*.pdf)] is selected as the file format in the example below. Other PDF file formats can be selected.
3. 
4. Select the [Convert to Searchable PDF] checkbox. Specify items such as [Language] or [Add password when creating PDF file] as required.
For details about each setting item, refer to "Help."
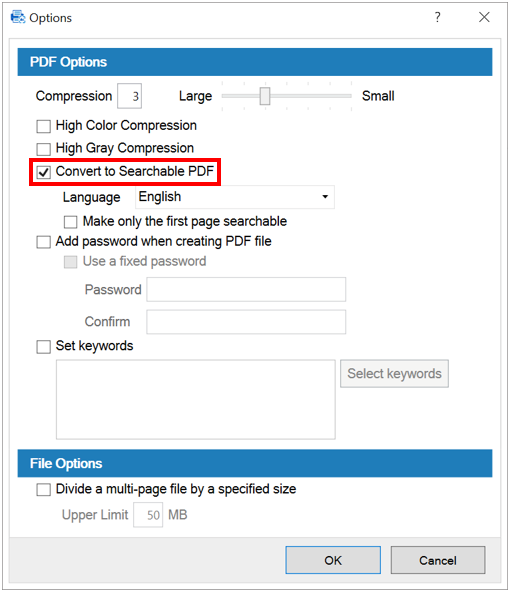
For Simple Scan mode
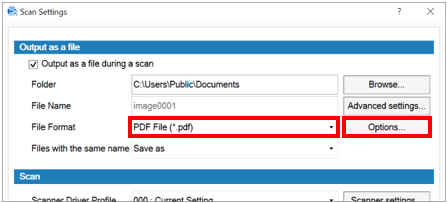
1. Click [Scan Settings] on the toolbar.

2. Select the PDF file format, then click the [Options] button.
Note: [PDF File (*.pdf)] is selected as the file format in the example below. Other PDF file formats can be selected.
3. 
4. Select the [Convert to Searchable PDF] checkbox. Specify items such as [Language] or [Add password when creating PDF file] as required.
For details about each setting item, refer to "Help."
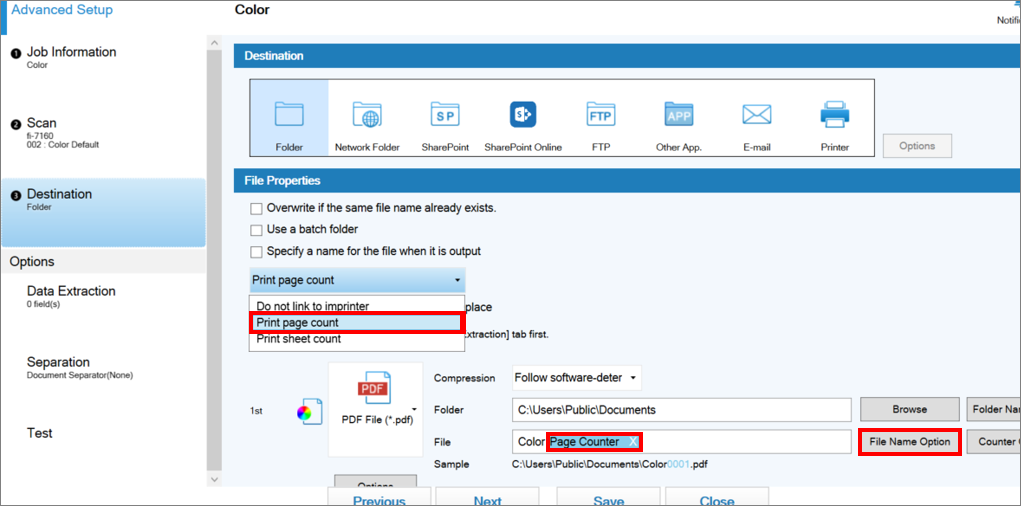
Yes, the imprinter can print the same value as the counter value for a file name. For details, refer to the following setting procedure.
- Start PaperStream Capture and select [Configure Jobs] from the menu.

- In the job list, create a new job or to edit an existing job.
- Specify the following settings in [File Properties] under the [3. Destination] tab. a. To sync with the page counter:
- Select [Print page count].
- Click [File Name Option] and add [Page Counter] to the file name.
- Select [Print sheet count].
- Click [File Name Option] and add [Sheet Counter] to the file name.
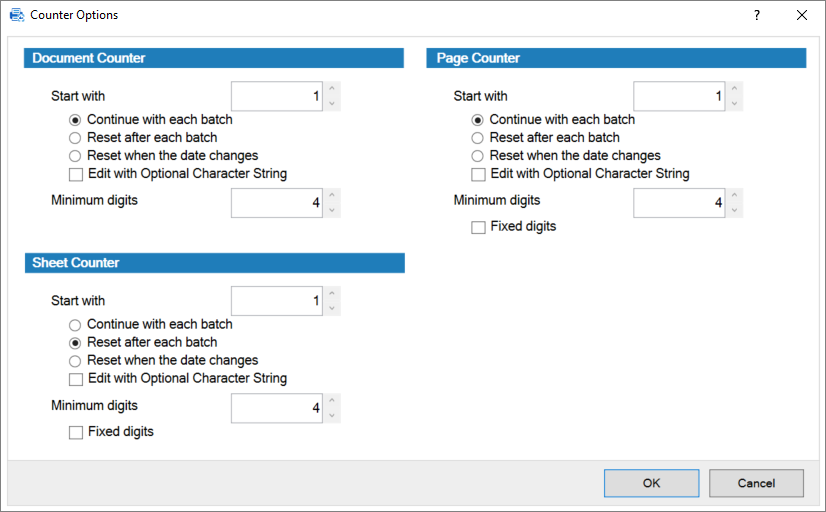
- Click the [Counter] button to the right of File, select the initial counter value settings in the [Counter Options] window, and then click [OK].
- Click the [Save] button to save the changes.
- Click the [Close] button to finish configuring the job.
Tip: If you want to print characters other than counters, configure the following setting for [String] under [Imprinter] in the settings window of the PaperStream IP driver.
Example: Test %04ud Test: character string (fixed value) %04ud: 4-digit counter (set the same number of digits as a counter value used for a file name)
Note: In the following cases, the file name and imprinter counters are not synced:
For details, refer to the PaperStream Capture Help.
a. For the Page Counter
- The number of pages scanned by the scanner and the number of pages recognized by the software do not match, due to blank page deletion, multi-image output, or any other reason
- In duplex scanning mode, the imprinter prints characters on the back side
- A separator is used or the number of pages is specified to divide a document stack into multiple stacks
- The page counter or the page output order is changed after scanning finishes and before a release process starts
- The number of sheets scanned by the scanner and the number of sheets recognized by the software do not match, due to blank page deletion, multi-image output, or any other reason
- A separator is used or the number of pages is specified to divide a document stack into multiple stacks
- The sheet counter or the sheet output order is changed after scanning finishes and before a release process starts
PaperStream IP Import is used to clean up pre-captured images. File Import is used to import and automatically separate electronically created documents such as PDFs by file name, without modifying the original file.
Run the executable at C:\ProgramData\PaperStreamCapture\MailImport\PaperStream Capture Add-in for Outlook.exe with full Windows administrator rights. This integration only works with Classic Outlook.
Yes. You can purchase as many seats as needed under a single license.
A pre-activation grace period allows time to install and become familiar with the software before the license term begins. It also helps align billing cycles to the end of the month.
Yes. The grace periods are the same for both products and apply to co-term purchases as well.
Provide your current license key to your reseller or enter it on the eCommerce site to place your renewal order. Upon payment, your existing license will be automatically extended. You can also purchase a new license and apply it after the current one expires. For more information, contact PAI Sales at (888) 425-8228 or sales@pfu-us.ricoh.com.
You have 30 days after expiration to renew before the software is disabled.
Yes. Third-party scanners are supported if they use TWAIN 2.3 or later. PaperStream Capture Pro supports Letter/A4 scanners, while Premium is required for Double-Letter/A3 scanners. Some features may be limited. Other devices may be supported through import functionality.
If the system that PaperStream Capture Pro is installed on uses Windows Defender, waiting time can be reduced by excluding PaperStream Capture Pro’s processes from real‑time monitoring.
1. Open [Windows Defender Security Center].
2. Select [Virus & threat protection settings].
3. Select [Process] for [Add an exclusion], and select the following processes of PaperStream Capture to exclude them from being monitored:
- PFU.PaperStream.Capture.exe
- PFU.PaperStream.Capture.Proc.exe
- ScandAllPDFProc.exe
To scan a barcode, it must meet specific conditions. Refer to "Barcode Types and Detection Parameters" in the PaperStream Capture Help to confirm that the barcode you want to scan meets these conditions.
If a barcode that meets the conditions cannot be detected, the problem may be solved by trying the following solutions.
Solutions
- Specify a higher resolution for [Resolution] (*1).
- Change the setting for [Image Mode] from [Automatic Color Detection] to [Black & White] or [Black & White] to [Automatic Color Detection] depending on the current setting (*1).
- Increase the resolution of the printed barcode (increase the print quality of the barcode).
- Enlarge the size of the printed barcode.
- Set a lower compression rate for scanned images to reduce noise due to compression (*1).
- Turn off the Cleanup function (*1).
- Print the barcode on a paper with a higher degree of whiteness.
- When the image is color or grayscale, go to [Color Adjustment] and specify a higher value for [Contrast] to enhance the contrast in brightness (*1).
- When the image is color or grayscale, go to [Color Adjustment] and and specify a higher value for [Brightness] to reduce noise (uneven coloring) in white areas (*1).
*1: This setting can be configured in the scanner driver "PaperStream IP". When configuring PaperStream IP from PaperStream Capture, refer to the information here.
Printed Code 39 barcodes may contain codes unsupported by the PaperStream Capture default supported format (Full ASCII mode) (*1). To fix this, clear the [Use Code 3 of 9 in Full ASCII mode] checkbox and confirm the issue is resolved.
Tip: This checkbox is available in PaperStream Capture 2.10.9 or later. If you are using an earlier version, update it to the latest version and configure this setting.
<Setting Procedure>
1. Click [Start] menu on Windows > [PaperStream Capture], then open [Administrator Tool]. (*2)
2. Clear the [Use Code 3 of 9 in Full ASCII mode] checkbox under [Barcode] in the [Output] tab.
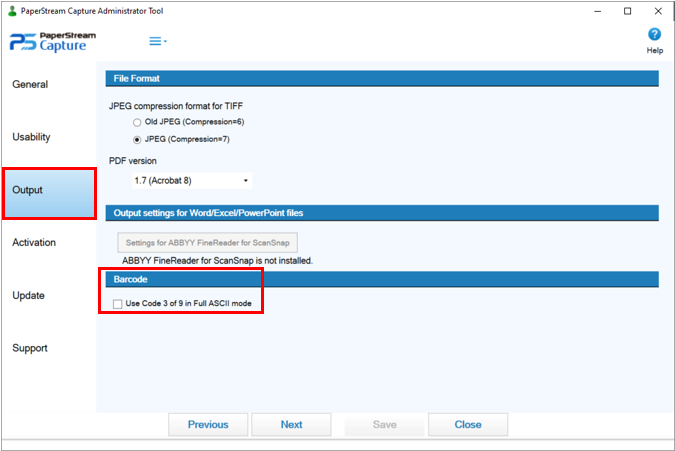
3. Click the [Save] button.
4. Click the [Close] button.
*1 For example, barcodes may contain codes with a sequence of symbols and numbers such as "+0".
*2 Make sure to open [Administrator Tool] from the Start menu on Windows, since the checkbox will not be displayed if you open [Administrator Tool] from the menu on the PaperStream Capture window.
The QR code that you are using may have been created with UTF-8 encoding.
Try the following.
<Setting Procedure>
- Start PaperStream Capture.
- From the menu ,select [Configure Jobs].
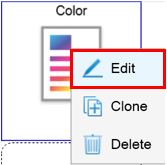
- Place the mouse pointer over the desired profile icon in the profile list, then right click on the icon and select the [Edit] icon
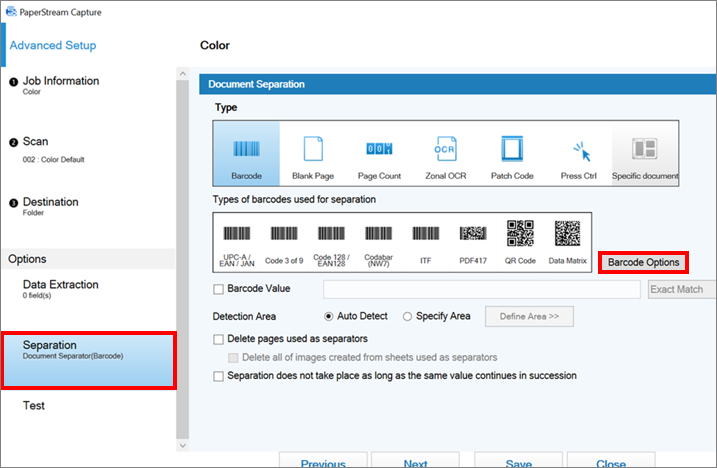
- Select the [Separation] tab and click the [Barcode Options] button.
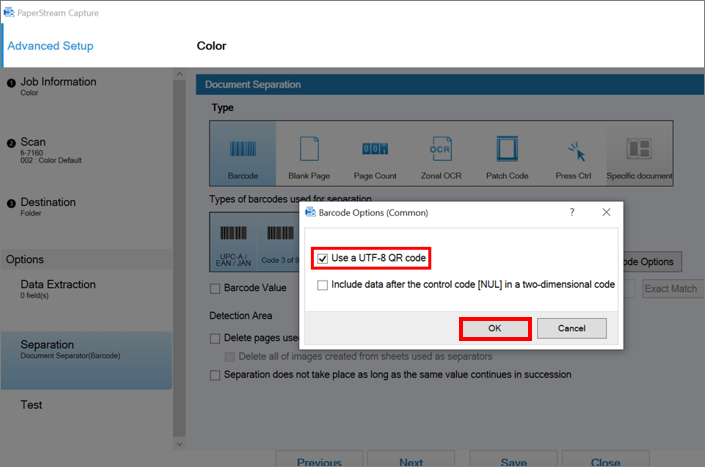
- In the [Barcode Options (Common)] dialog, select the [Use a UTF-8 QR code] check box, then click the [OK] button.
- Perform a scan using the edited profile to confirm whether the QR code is recognized correctly.
Note: This setting can be used for PaperStream Capture v3 or later.
If a barcode is not recognized, it will not be added to the file or folder name in PaperStream Capture or PaperStream Capture Pro. Verify recognition in the confirmation window for scanned images. If the right index panel is blank, manually enter the correct value from the keyboard.
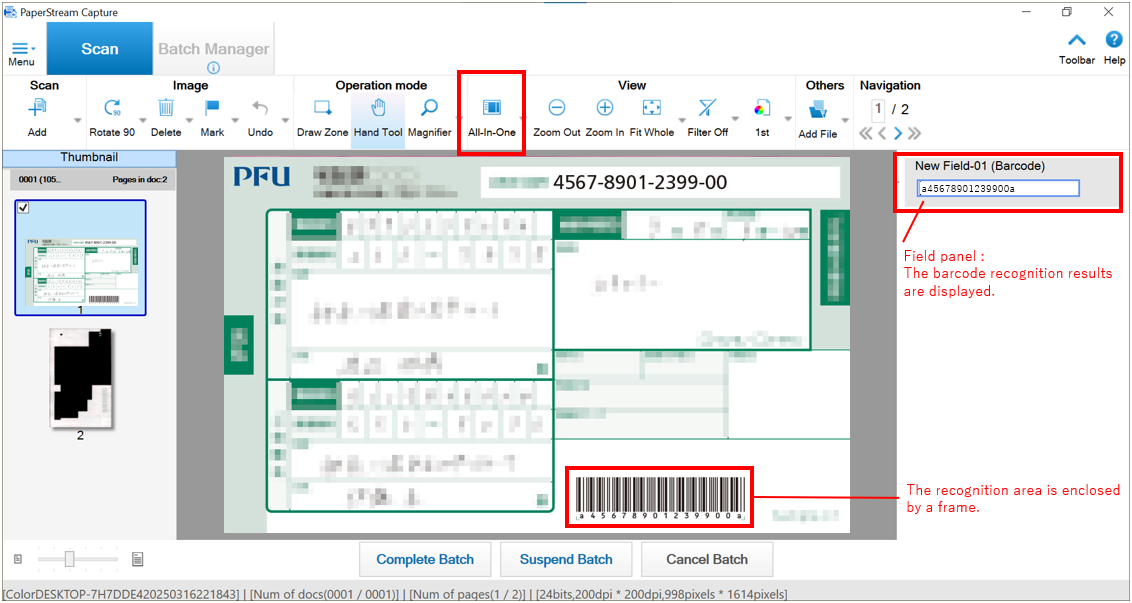
For information on what to do if the barcode cannot be recognized, refer to here.
Open the [Batch Manager] window in PaperStream Capture or PaperStream Capture Pro and hover the mouse cursor over the name of the released batch to display the destination folder in the pop-up display.
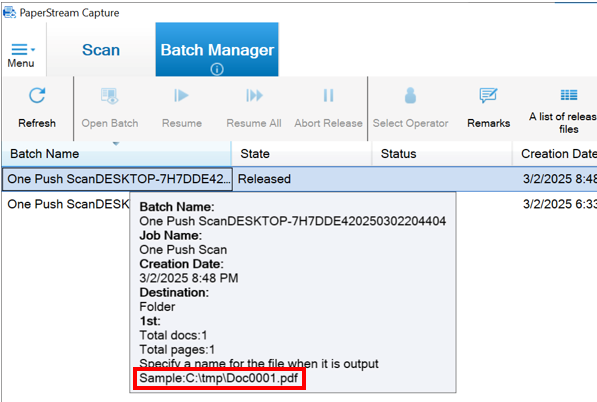
Note: The screens and procedures may differ depending on the product and OS version you are using.
Follow the following setting procedure to check the file name settings.
<Setting Procedure>
- Abort all the batches that are in progress in the [Batch Manager] window, if any. Click on the
 icon next to the indicator or [Releasing or suspending batch] on the status bar in the bottom left of the window, then click the [Abort All] button.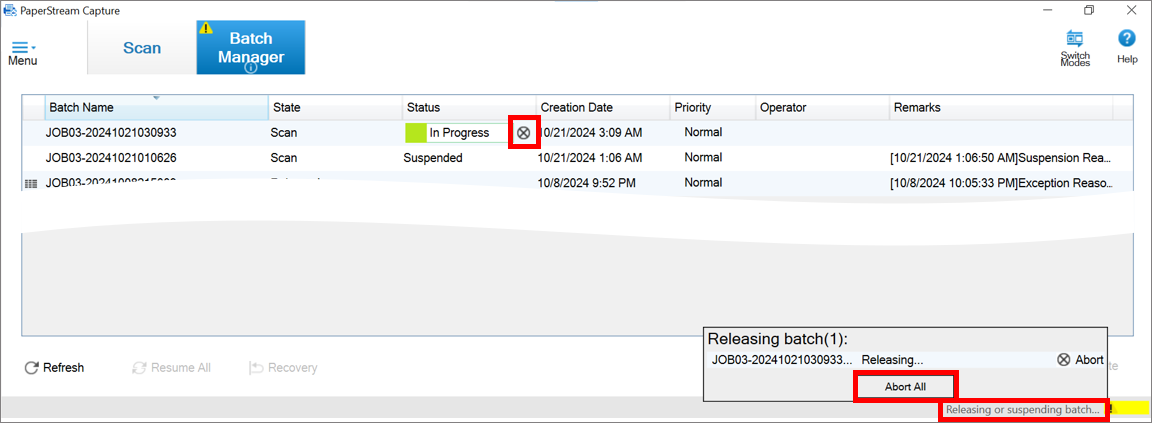
- From the menu
 , select [Configure Jobs].
 - Select the icon of the job with the error, and select [Edit] from the right-click menu to edit the job.
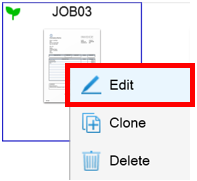
- In the [3. Destination] tab, add name rules such as [Document Counter] and [Page Counter] for [File] so that images created from multiple scanned documents will not have the same name.
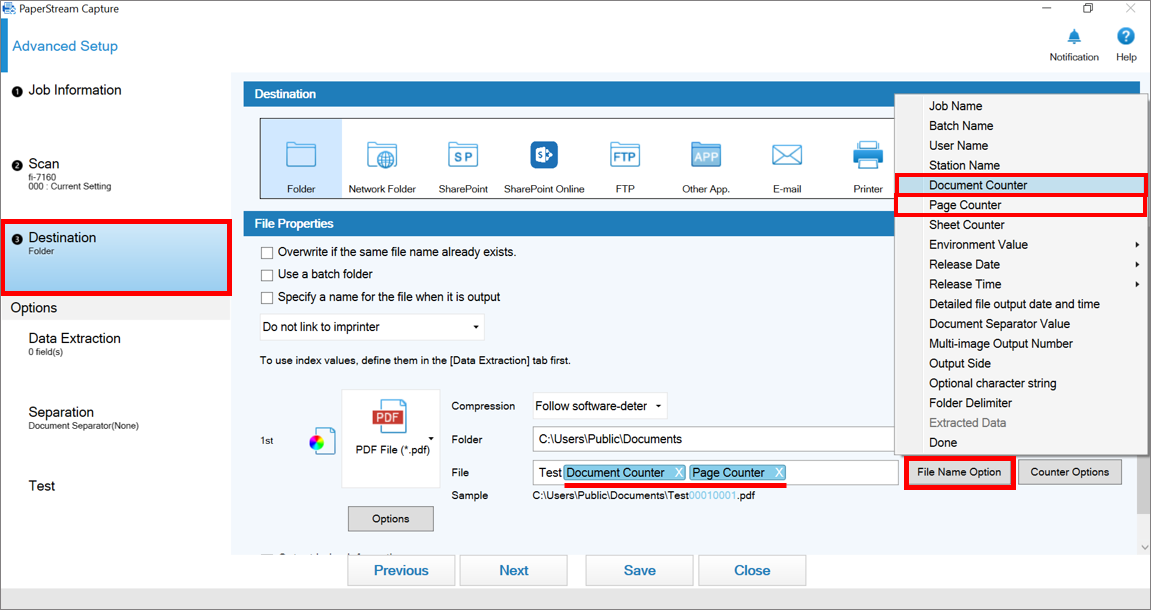
- Tips! If you want to save multiple images as a single file, select a multipage format (such as "PDF" or "Multipage Tagged Image File Format").
- Click the [Save] button to save the changes.
- Click [Close] to finish configuring the job.
- To resume releasing the aborted batches, double-click each batch or click [Resume ALL] in the [Batch Manager] window.
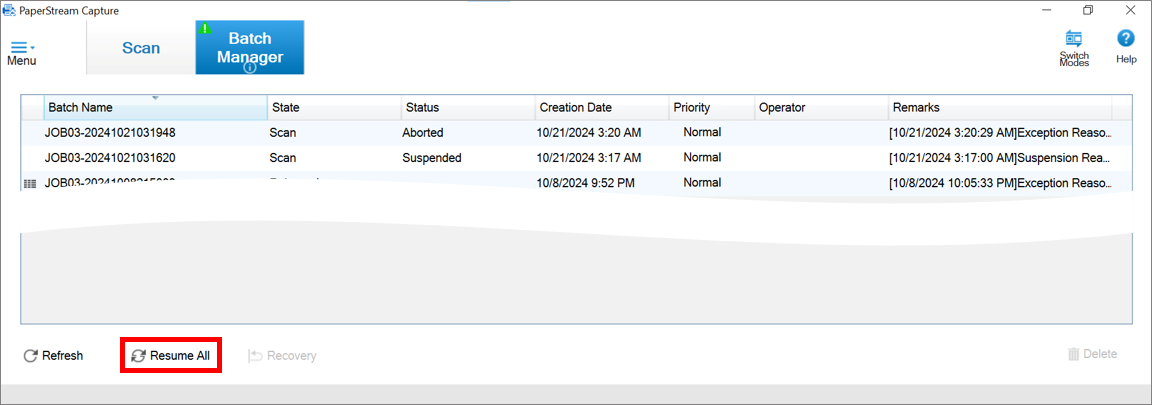
- Make sure that "Released" is displayed for [Status].
Follow the following setting procedure to check the file name settings.
<Setting Procedure>
- Abort all the batches that are in progress in the [Batch Manager] window, if any. Click on the icon next to the indicator or [Releasing or suspending batch] on the status bar in the bottom left of the window, then click the [Abort All] button.
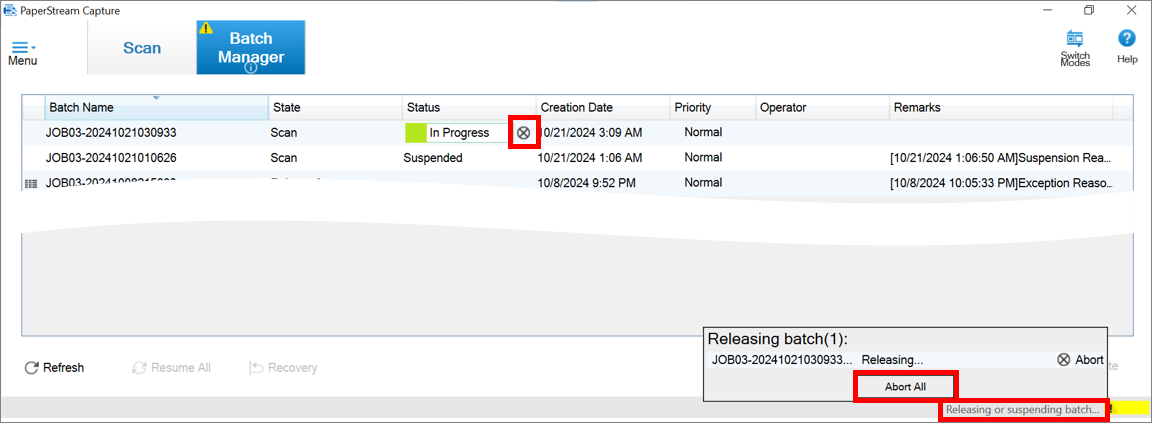
- From the menu , select [Configure Jobs].
- Select the icon of the job with the error, and select [Edit] from the right-click menu to edit the job.
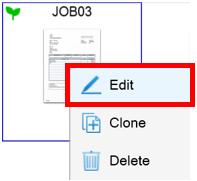
- In the [3. Destination] tab, add name rules such as [Document Counter] and [Page Counter] for [File] so that images created from multiple scanned documents will not have the same name.
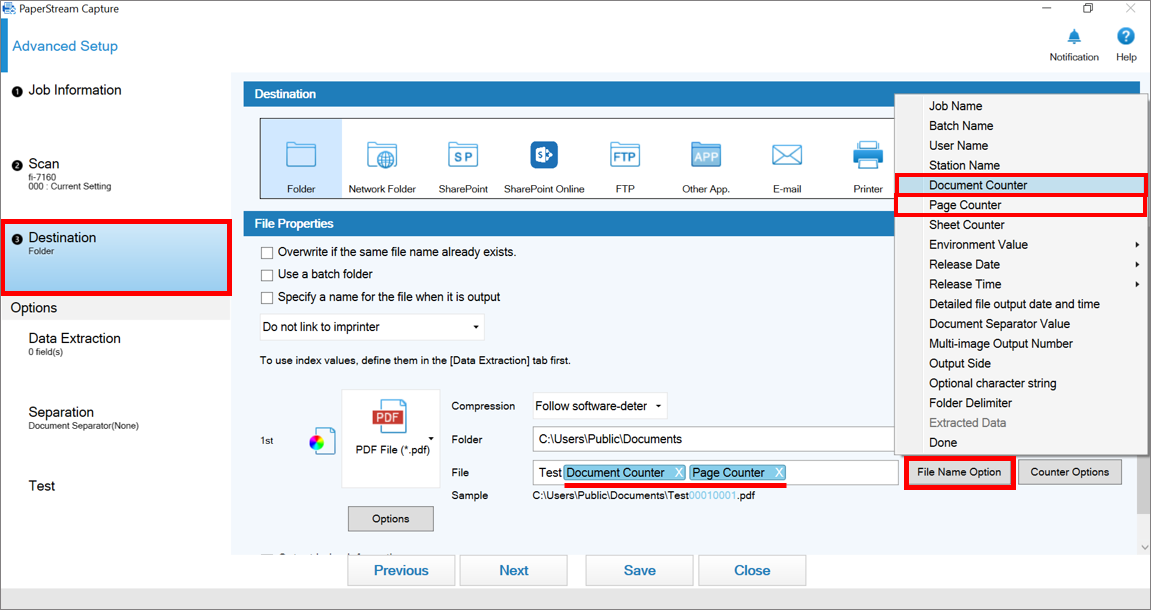
Tips! If you want to save multiple images as a single file, select a multipage format (such as "PDF" or "Multipage Tagged Image File Format").
- Click the [Save] button to save the changes.
- Click [Close] to finish configuring the job.
- To resume releasing the aborted batches, double-click each batch or click [Resume ALL] in the [Batch Manager] window.
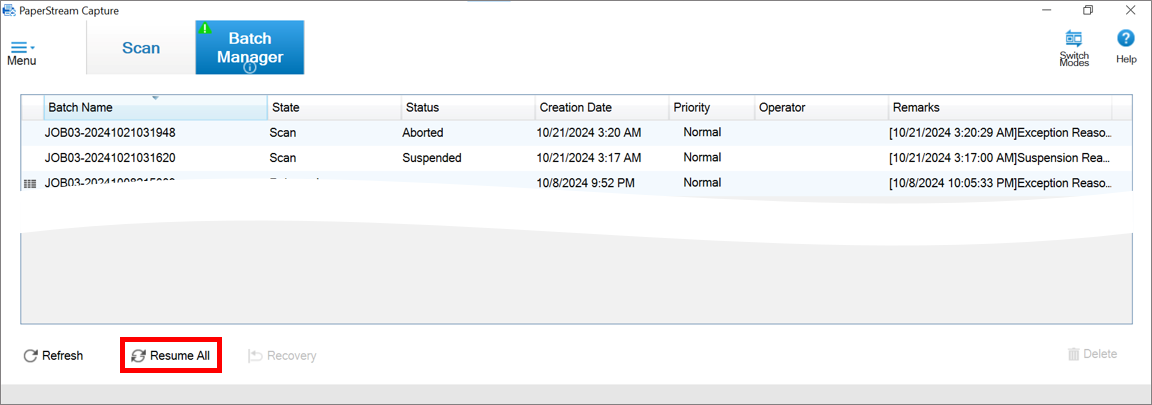
- Make sure that "Released" is displayed for [Status].
If the [Delete] button for the profile icon is grayed out in the profile configuration window and the profile cannot be deleted, check the following:
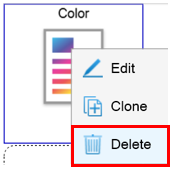
Items to check:
- If you are currently logged in to Windows as a user without administrator privileges: Log in to the Windows computer as a user with administrator privileges and then delete the profile. If you are logged in to Windows as a user without administrator privileges, you cannot delete any profiles.
- If a batch is in progress: Check the [Batch Manager] window and, if there is a batch in progress, delete the profile after the batch is complete.
Are you logged in to the computer as a user with administrator privileges?
Log in to the computer as a user with administrator privileges and delete the batch job.
Tips:
- You cannot delete the batch job if you are logged in to the computer as a Standard User.
- You cannot delete the batch job if the [Batch Manager] window shows [In Progress] or [Aborted] as its status.
In this case, perform the following steps according to its status.

- For a batch job with an [Aborted] status: Double-click the batch name. The status changes to [In Progress] and saving resumes.
- For a batch job with an [In Progress] status: Wait until the In Progress indicator disappears and [Released] is displayed for [Status]. If saving does not complete after a while, refer to What should I do if the [Batch Manager] window keeps showing [In Progress]? to solve the problem.
Check whether the warning icon is displayed, then follow the respective solution:
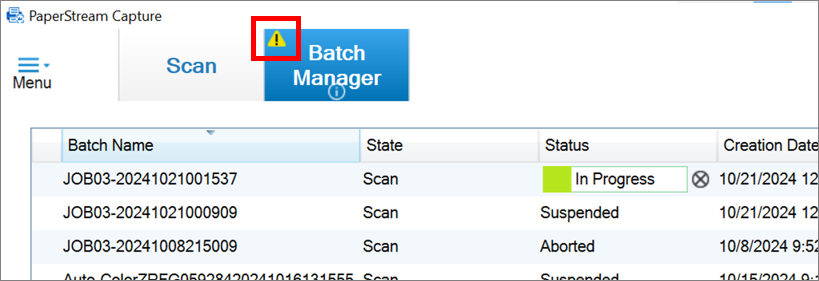
When the  icon is displayed on the [Batch Manager] button
This message appears in the following cases, requiring you to check the status and take appropriate action:
(a) A file cannot be saved because another file with the same name exists in the destination.
(b) The job is configured to allow multiple files with the same name.
(c) The job is configured to set a password for a PDF when saving.
<Solution>
Check the status and take measures accordingly.
- Click one of the following notifications.
- The icon in the bottom right of the window
- The icon in the upper left on the [Batch Manager] button
- Notification banner from the taskbar (The figure below is an example of Windows 10).
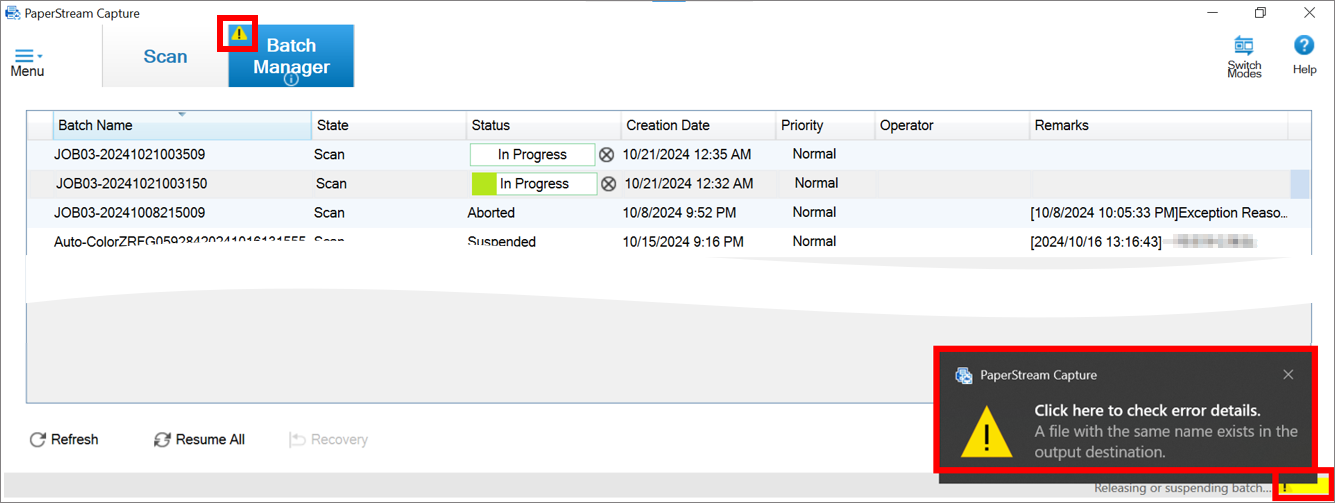
- The
- A confirmation window will be displayed(*). Select the appropriate measure in accordance with the instructions on the confirmation window.
- When a file cannot be saved to the save destination because a file with the same name already exists
Select the appropriate measure in accordance with the instructions on the [Files with the same name] window. In addition, take the following measure (b) with regard to the file name settings in the job.
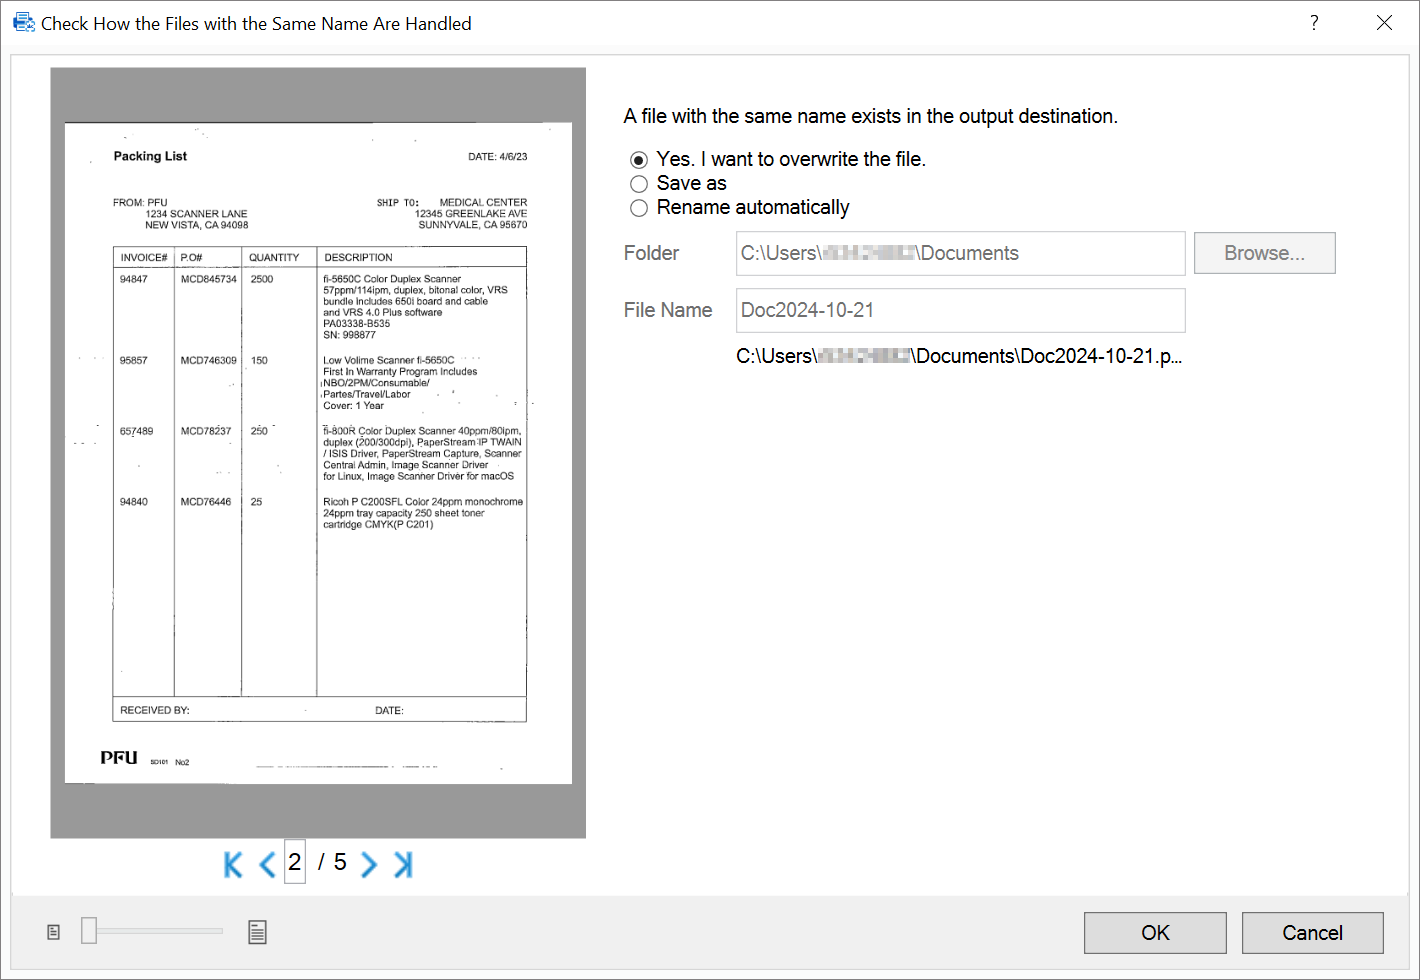
- If the job is configured to allow multiple files with the same name to be saved Refer to I've received a notification stating that "A file with the same name exists in the output destination.". What should I do in order not to output a file with the same name as an existing file name? and check the file name settings in the job.
-
When the job is configured to set a password for PDF files when saving
Enter a password and select the [OK] button. If you do not want to set a password, select [Cancel].
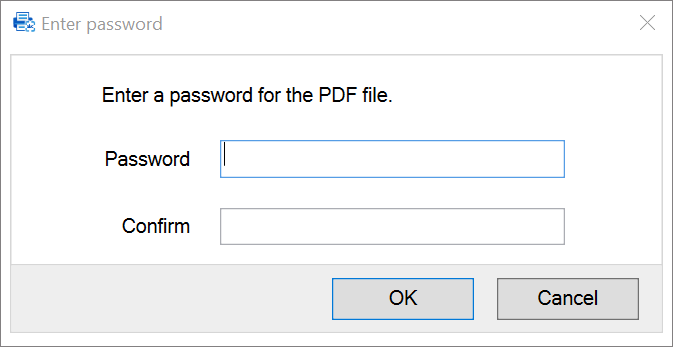
*: A confirmation window as described above will be displayed in version 2.5 or later.
When the icon is not displayed
To update PaperStream Capture to the latest version
<Solution>
- Open the [Batch Manager] window
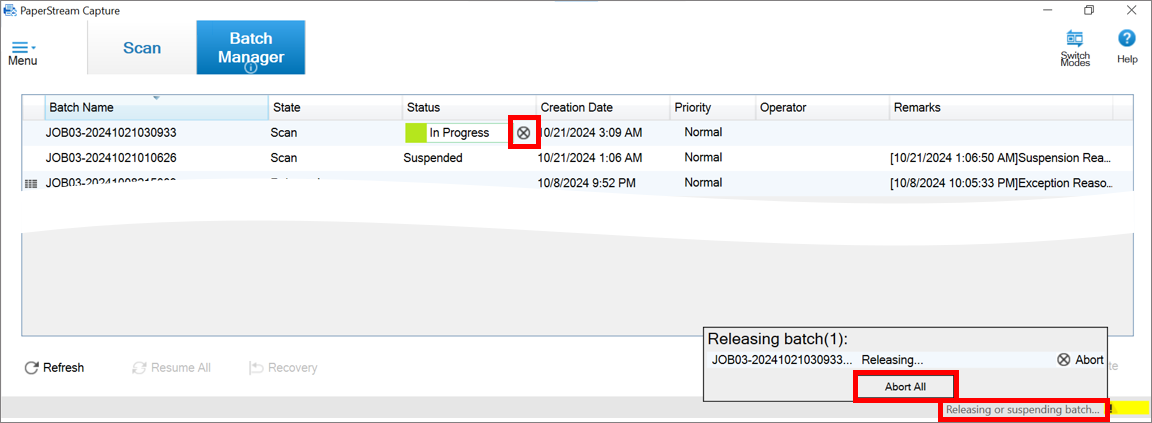
- Abort the batch in progress.
Click on the icon next to the indicator or [Releasing or suspending batch] on the status bar in the bottom right of the window, then click the [Abort All] button.
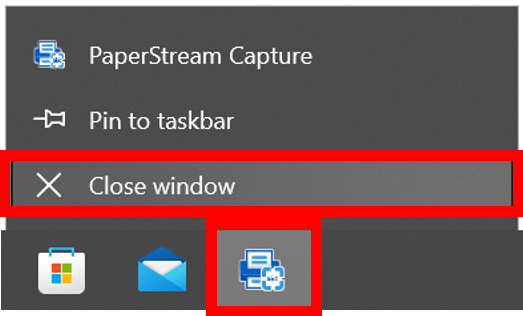
- Exit PaperStream Capture.
Note: Check the taskbar. If the PaperStream Capture icon is displayed, right-click the icon and select [Exit].
- Update PaperStream Capture to the latest version. Select [Start] menu > [fi Series Online Update] > [fi Series Online Update]. The application will automatically check whether or not there are any updates. Follow the instructions in the window. Note: If fi Series Online Update is not installed, download it from here.
- When the update is complete, start PaperStream Capture. To resume releasing the aborted batches, double-click an aborted batch individually or click [Resume All] in the [Batch Manager] window.
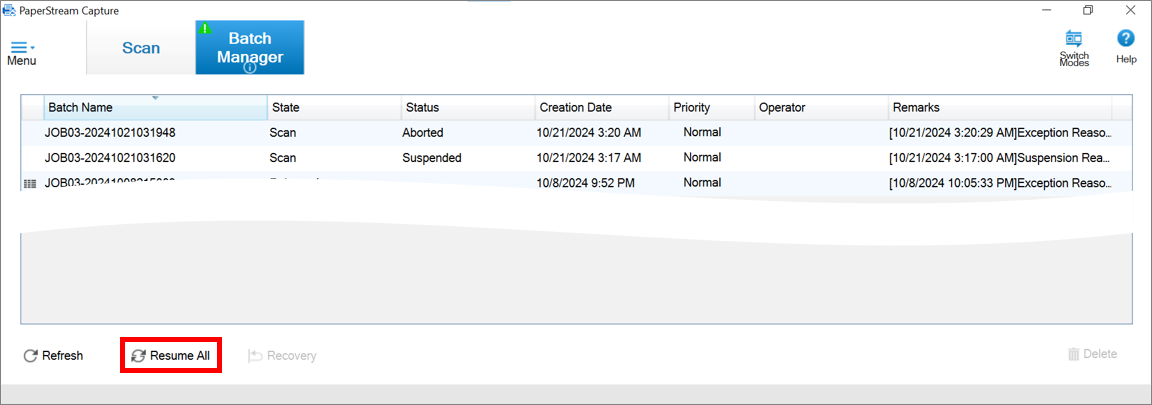
- Make sure that "Released" is displayed for [Status].
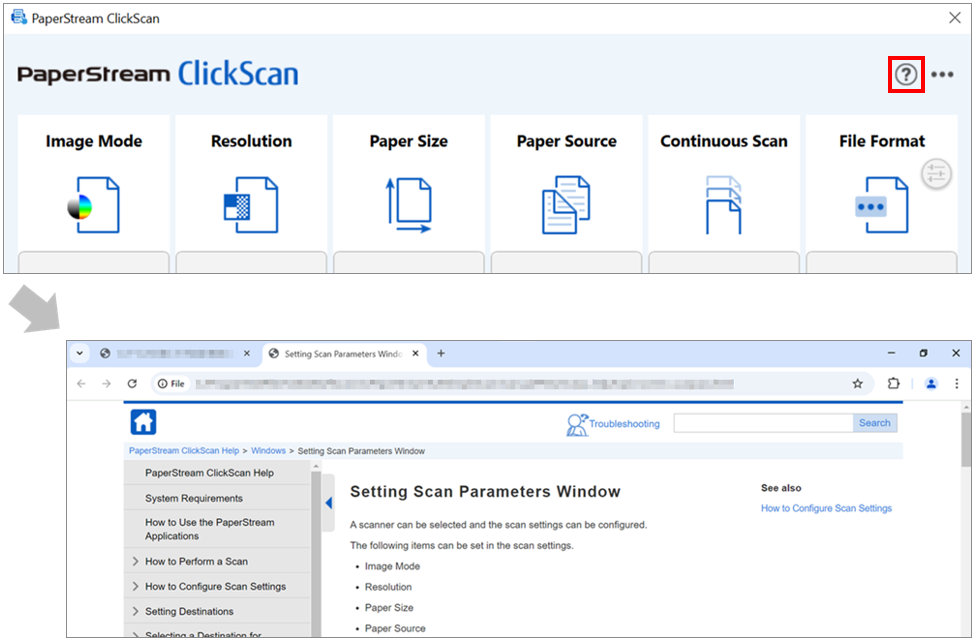
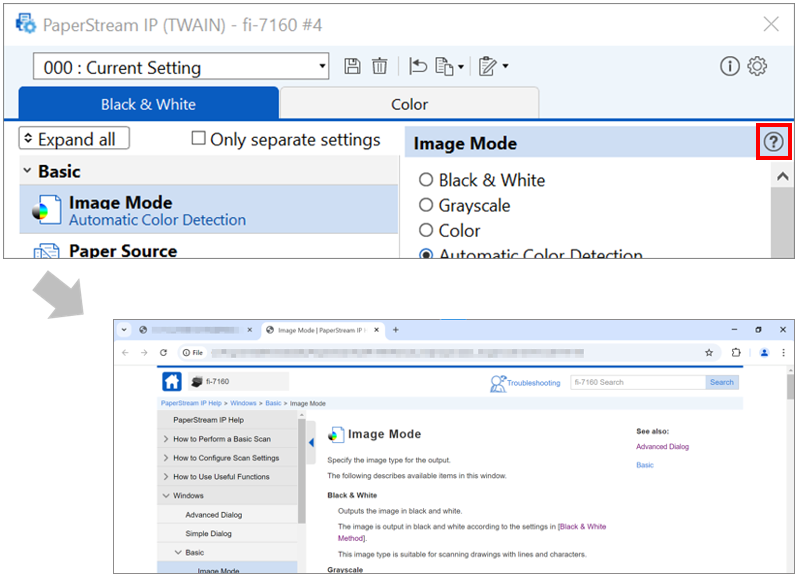
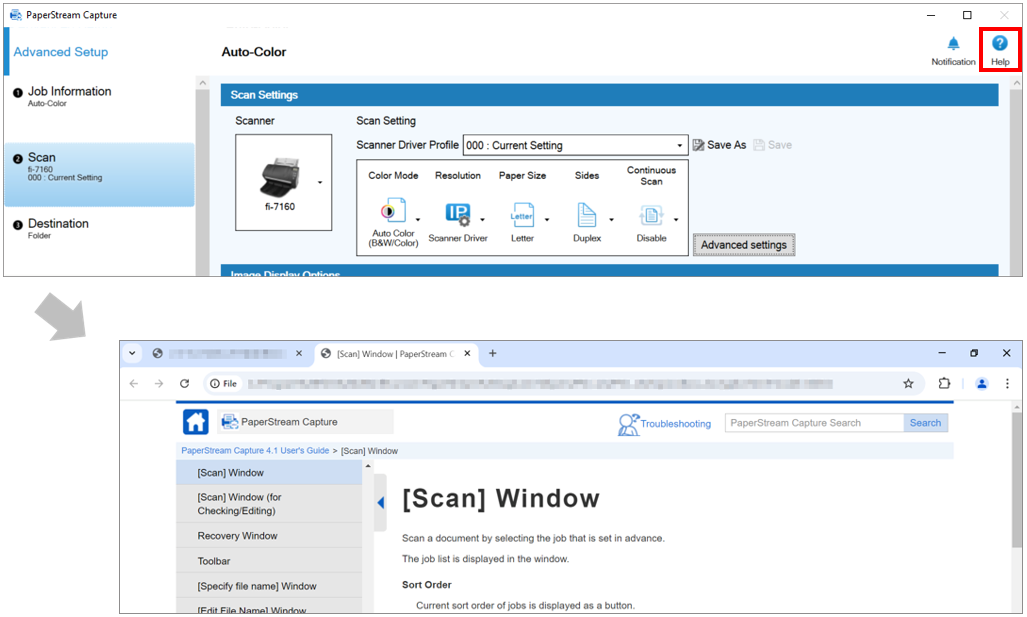
Detailed information on how to use the software and setting items is given in the help for each software.
To refer to the help, click the [?] icon displayed on the window for each software.
Use the search function in the help window to search for the item you want to check and see the displayed information.
PaperStream IP
PaperStream Capture
PaperStream ClickScan