Pulling out old photos is a great way to reminisce with family and loved ones, but repeated exposure to light, air, and our skin’s natural oils degrade photos over time. Even the best-stored photographs will eventually fade, making preserving these treasured memories increasingly difficult.
Rather than leave the fate of your photographs up to the elements, using a photo scanner to digitize them ensures your memories will survive. Plus, you can easily share digital copies on social media or load them into digital picture frames. Read on to learn how to scan and digitize photos, regardless of their age or quality, and the settings you’ll need to make the best images possible.
Got something else that needs scanning? Check out our comprehensive guide, "How to Scan Just About Anything."

What to look for in a photo scanner
Dots per inch (dpi)
If you’re looking for the highest quality detail in your photo scans, pick a scanner with a high dpi value. 300 dpi is a good baseline for average use, especially if you only plan to share images on social media. But if you’re looking for higher-quality scans, stick with a minimum of 600 dpi.
A high dpi won’t just make a better-looking photo — it will allow you to blow up images into larger prints with a minimum loss of image quality. For example, a 4” x 6” photo scanned at 600 dpi will still look great when enlarged to an 8” x 12” print.
ADF scanning options
Scanners with automated document feeders (ADF)can scan multiple images at once, but they’re generally best used on standard photo sizes that are in good shape. Inserting older photos, smaller wallet-sized photos, or brittle photos through a feeder may damage the physical print and ruin the scan. A carrier sheet can protect your photos when scanning with an ADF.
Photo scanning software
Bundled scanning software will make digitizing thousands of family photos much faster. Minimum requirements should include the ability to set album names for quick and consistent organization — a searchable database is even better. See if your software also includes automatic touch-up features that will auto-rotate images, fix askew scanning issues, remove dust or abnormalities, or improve image detail on the fly.
Check out our Photo Scanners page to learn more about our best photo scanners.
Tips for digitizing photos
- Avoid touching the image on the front of the photograph. The image is where the emulsion chemicals are, and your skin’s natural oils can ruin image quality and introduce bacteria that can permanently damage the photo.
- Use nitrile gloves whenever possible. Cotton gloves can transfer dirt, and latex gloves contain chemicals that can damage photos over time. When wearing gloves, take extra caution not to touch your face or skin.
- Find a clean, open space to gather and sort photos, free from dust or clutter. Avoid using chemical cleaners when tidying.
- Always place photos image-side up to preserve image quality.
- Use compressed air to clean the dust off photographs. Never use water or other fluids.
- Clean the scanner bed or feeder tray with a lint free cloth. Use manufacturer recommended cleaning materials to clean the scanner.
- Keep photo stacks small (less than an inch thick) to avoid placing too much pressure on them. Keep them sorted in similar-sized stacks to avoid bunching or folds.
- If using an automated document feeder, place smaller or oddly shaped photos (like wallet-sized images) in carrier sheets,, which keeps photos from crumpling or jamming in the feeder.
Use the correct scanner settings
First, ensure your scanner uses the correct dots per inch (dpi) settings. The higher the number, the more detailed your scans will be. If you only plan to share photos online, stick with 300 dpi. Increasing the dpi to 600 is great for capturing little details but can greatly increase the size of the scanned file and may exceed sharing platforms file size limits.
If you’re using a scanner with an automatic document feeder (ADF), you may be able to capture both sides in a single scan. Your photos may have notes or dates written on the back, and activating two-sided scanning in your scanning software will capture that information along with the image on the front.
Some software will let you set up a file naming convention before initiating a scan. The software will then apply a uniform filename across all your scans, keeping albums organized without manually editing the name of each image. The image format is usually the last setting to check before beginning a scan. Usually, this option defaults to JPEG, a compressed image format great for sharing online. The included scanning software will often allow you to modify the JPEG compression rates for quality or file size.
Did You Know? The ScanSnap Home Software organizes scans, includes automated image correction features, and features user-friendly icons for quick navigation.
How to scan pictures
After successful configuration, place the photos in your scanner. Follow the instructions below to determine how to scan photos based on your scanner model:
How to scan photos with a flatbed scanner:
- Open the lid of the flatbed scanner. Ensure that the scanning bed is clean and free of smudges or dirt.
- Place the photo image-side down, lining the corner of the photo with the designated corner on the scanner.
- Close the scanner bed.
- Once photos are in place, either press the Scan button on your scanner or initiate the scan from your chosen scanning software.
How to scan photos with an ADF scanner:
- Stack similarly-sized photos together, ensuring the stack is as uniform as possible.
- Place the stack on the loading tray, image-side down. Use included photo sorting trays, if applicable.
- Use a manual feed option (if available) for awkward or fragile photos.
- Use a carrier sheet to add an extra layer of protection for your photos.
- Once photos are in place, either press the Scan button on your scanner or initiate the scan from your chosen scanning software.
Once photos are in place, either press the Scan button on your scanner or initiate the scan from your chosen scanning software. The time to complete each scan depends on the type of scanner, dpi, and file format settings. Higher-quality settings will take longer to scan than lower-quality settings.
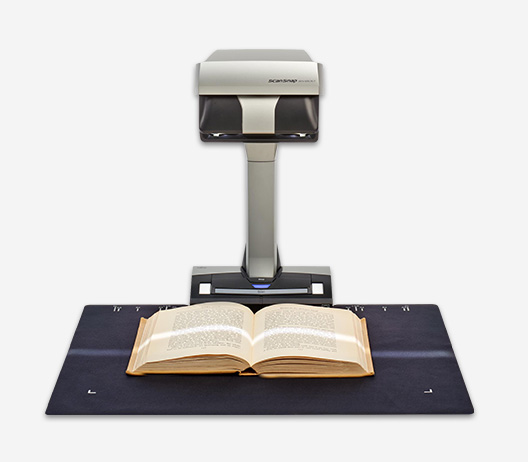
Did You Know? PCMagazine described the ScanSnap SV600 as a book, document, and photo scanner with extra features “worth checking out.” Click here to read the full review.
How to scan multiple photos at once
If you have a collection of fairly sturdy photographs you want to digitize at once, consider using an automatic document feeder (ADF) scanner. Simply stack all the photos together, make sure your scanner is set to your preferred dpi and start scanning. If your scanner comes with sorting trays, make sure to use them. Consider putting more fragile photos inside a carrier sheet for added protection. Using an ADF will save you a lot of time, but it’s not without risk; it can bend or otherwise harm your photos, so weigh efficiency against the potential loss or degradation of your originals.
How to digitize old photos
Dust your photos and scanner
Before you send a photo through your scanner, use a soft, dry cloth to wipe off any dust or other debris. Skipping this step could result in subpar digital versions of your photos, forcing you to scan again.
Don’t fight creases
Attempting to reverse a crease will likely result in more damage to the photo, and no matter how badly it’s been folded, it will scan better than a torn one. Instead, simply lay it as flat as you can when scanning. If the crease does show up in your digitized version, you can use photo editing software to remove it without risking further damage to the print original.
Use a flatbed scanner
Flatbed scanners can often push the DPI even higher, which produces larger digital files and enables larger prints to be made down the line. They’re also more delicate with the material being scanned.
Keep reading for more information on how to pick the right scanner for your photos.
Why scan photos?
Now that you know how to scan photos, you may be wondering why it’s worthwhile to do so. There are three primary reasons: preservation, sharing, and enhancement.
Photo preservation
While physical photos can last years — or even decades — they may not do so in pristine condition. Air and light can degrade photos over time, as can exposure to human skin. Unless you store your photos in a temperature-controlled, low-light environment and handle them only with gloves, they will become less vibrant and durable over time. Scanning a photo essentially freezes it in time and allows you to reproduce it at its original quality, whenever you wish.
Photo sharing
Physical photos are also difficult to share. You can show your photos to people who come to visit you, you can mail off an original, or you can create a copy. Compare this to a digital photo, which you can share via text, email, or online photo storage. The process takes only a few seconds, and you can do it as many times as you want.
Be aware that digital systems are also prone to degradation over time. You’ll want to spot-check the media you use to store your scanned photos now and then, and keep track of them as you transfer files and upgrade your hardware.
Photo enhancement
As you digitize your collection, you might discover a perfect scan of an imperfect photo. Some photos are blurry, indistinct, or discolored right from the start. Others degrade over time, particularly if they’ve been exposed to light or moisture. Either way, photo editing software gives you a chance to digitally correct them.
While specialists have been editing photos for hundreds of years, photo editing software lets anyone try their hand at it. In fact, many programs automate the process, meaning that you can correct photos with a few simple clicks rather than hours of graphic design work. The ScanSnap Home software, for example, can automatically color-correct aged or sun-damaged photos, making the colors more vibrant and realistic. It can also remove the “red eye effect” common to flash photography.
Our recommendation: ScanSnap iX2400 and SV600
Part of learning how to scan photos is selecting the right hardware for the job. We know you have no shortage of options when it comes to choosing a home document scanner. We pride ourselves on having spent the last 85+ years designing and developing some of the most beloved electronics in the world, including our line of award-winning, easy-to-use, one-touch ScanSnap scanners.
The ScanSnap iX2400 is a fantastic option for most photo scanning needs. Featuring a high-speed automatic document feeder, the iX2400 can hold up to 50 photos at a time, and scan up to 80 images per minute with the push of a button. The integrated Ultrasonic Sensor and Streak Reduction features ensure image scans are as clean and high-quality as possible. ScanSnap scanners also leverage our proprietary scanning software, which includes features like automatic face recognition, photo rotation, color restoration and red-eye reduction. It also records dates printed on photos as Exif metadata to provide a better user experience.
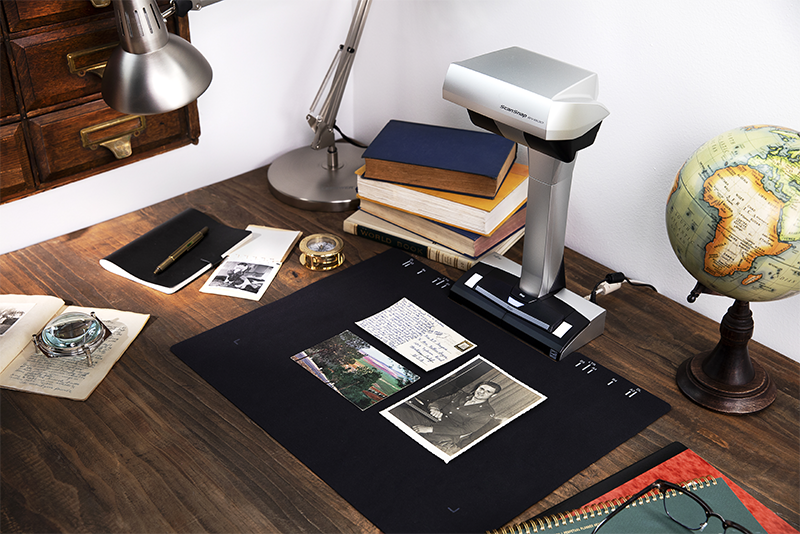
For archival purposes, the ScanSnap SV600 is an overhead scanner that’s perfect for books, thicker documents, or delicate photos that are unsuitable for sheet-fed or flatbed scanners. Our Versatile Imaging technology combines high-end CCD optics and advanced LED illumination to ensure image scans are crisp, clear, and steady. Plus, the included software provides auto image correction features that automatically crop and de-skew scans to make image archival fast and easy. Click here to learn more and shop the full line of ScanSnap scanners.
Note: Information and external links are provided for your convenience and for educational purposes only, and should not be construed, or relied upon, as legal or financial advice. PFU America, Inc. makes no representations about the contents, features, or specifications on such third-party sites, software, and/or offerings (collectively “Third-Party Offerings”) and shall not be responsible for any loss or damage that may arise from your use of such Third-Party Offerings. Please consult with a licensed professional regarding your specific situation as regulations may be subject to change.